While writing blogs on AI, I encountered numerous compatibility issues within the Python ecosystem on Windows. Creating functional examples is often more challenging compared to other operating systems like macOS and Linux distributions. Recently, I discovered that setting up Linux distributions via the Windows Subsystem for Linux (WSL) can resolve many of these issues, streamlining the development process.
The Windows Subsystem for Linux (WSL) is a powerful feature in Windows 11 that allows you to run a Linux distribution alongside your Windows environment without the need for a virtual machine or dual-boot setup. This guide will walk you through the process of setting up WSL and installing a Linux distribution on Windows 11.
What is WSL?
WSL is a compatibility layer developed by Microsoft that enables native Linux binaries to run on Windows. With WSL 2, the latest version, you get a lightweight virtual machine with a full Linux kernel, offering improved performance and full system call compatibility. This makes it ideal for developers, system administrators, and anyone who wants to use Linux tools on a Windows system.
Prerequisites
Before you begin, ensure you have the following:
- A PC running Windows 10 Pro.
- Administrator access to your system.
- An internet connection to download the necessary components.
Step-by-Step Guide to Setting Up WSL
Step 1: Enable WSL on Windows 11
- Open PowerShell or Command Prompt as Administrator:
- Press Win + S, type PowerShell, right-click, and select Run as administrator.
- Enable WSL:
- Run the following command to enable the WSL feature:
wsl --install - This command enables WSL, installs WSL 2 as the default version, and downloads the default Linux distribution (usually Ubuntu). If WSL is already enabled, this command will proceed with installing the default distribution.
- Run the following command to enable the WSL feature:
- Restart Your Computer:
- After running the command, you may need to restart your system to complete the installation of WSL components.
Step 2: Install a Linux Distribution
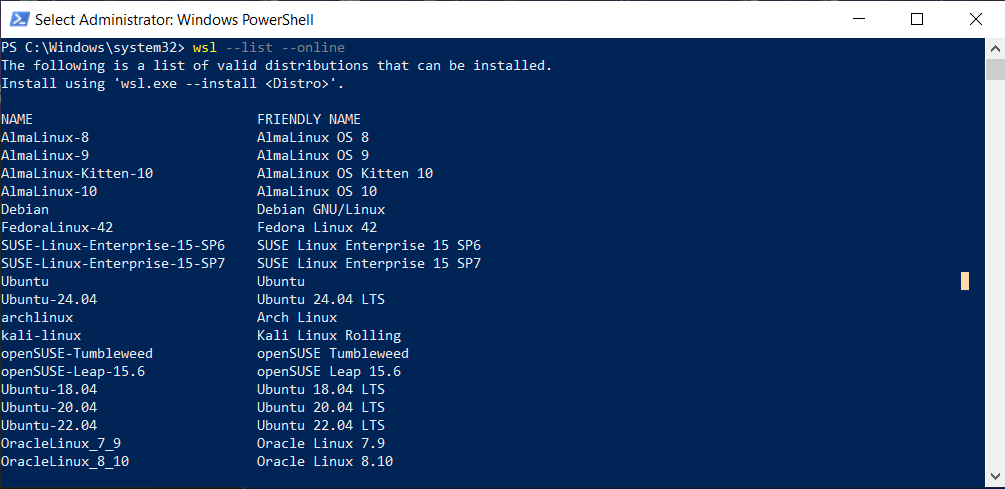
- Check Available Distributions:
- To see the list of available Linux distributions, run:
wsl --list --online- This will display a list of distributions, such as Ubuntu, Debian, Kali Linux, and others.
- Install a Specific Distribution:
- To install a specific distribution, use the following command (replace Ubuntu with your preferred distribution, e.g., Debian or kali-linux):
wsl --install -d Ubuntu- This will download and install the specified distribution.
- Set Up the Linux Distribution:
- Once the installation is complete, the Linux distribution will launch automatically.
- You’ll be prompted to create a username and password for your Linux user account. This is separate from your Windows credentials.
Step 3: Verify the Installation
- Check Installed Distributions:
- Run the following command to list installed distributions and verify that your chosen distribution is set up:
wsl --list --all
- The default distribution will be marked with an asterisk (*).
- Set the Default Distribution (Optional):
- If you have multiple distributions installed and want to set a specific one as the default, use:
wsl --set-default <DistributionName>
For example:wsl --set-default Ubuntu- Launch Your Linux Distribution:
- Open a terminal for your Linux distribution by typing:
wsl - Alternatively, specify the distribution:
wsl -d Ubuntu
- Open a terminal for your Linux distribution by typing:
Step 4: Update and Upgrade Your Linux Distribution
- Update Package Lists:
- Once inside the Linux terminal, update the package lists to ensure you have the latest software versions:
sudo apt update - For non-Ubuntu distributions, use the appropriate package manager (e.g., yum for Fedora-based systems or pacman for Arch-based systems).
- Once inside the Linux terminal, update the package lists to ensure you have the latest software versions:
- Upgrade Installed Packages:
- Upgrade the installed packages to their latest versions:
sudo apt upgrade -yStep 5: Configure WSL (Optional)
- Set WSL 2 as Default for All Distributions:
- Ensure all distributions use WSL 2 for better performance:
wsl --set-default-version 2- Customize WSL Settings:
- You can configure WSL settings by editing the .wslconfig file in your Windows user directory
 (C:\Users\<YourUsername>\.wslconfig).
For example:
[wsl2]
memory=4GB processors=2- This file allows you to limit memory, CPU usage, or enable features like nested virtualization.
- Access Windows Files from Linux:
- Your Windows drives are mounted under /mnt in the Linux environment (e.g., C: is available as /mnt/c). You can navigate to these directories to access Windows files.
Step 6: Install Additional Tools (Optional)
- Install common development tools inside your Linux distribution. For example, on Ubuntu:
sudo apt install -y build-essential git python3 nodejs- You can also install GUI applications and use them with WSLg (Windows Subsystem for Linux GUI), which is built into Windows 11. For example, to install a graphical text editor like gedit:
sudo apt install -y gedit - Launch GUI apps directly from the Linux terminal, and they will appear as native Windows applications.
Step 7: Troubleshooting Common Issues
- WSL Not Enabled:
- If the wsl –install command fails, ensure the “Windows Subsystem for Linux” and “Virtual Machine Platform” features are enabled:
- Go to Settings > Apps > Optional Features > More Windows Features.
- Check Windows Subsystem for Linux and Virtual Machine Platform, then restart.
- If the wsl –install command fails, ensure the “Windows Subsystem for Linux” and “Virtual Machine Platform” features are enabled:
- Distribution Not Found:
- If a distribution fails to install, try downloading it manually from the Microsoft Store or check your internet connection.
- Performance Issues:
- Ensure you’re using WSL 2, as it offers better performance than WSL 1. Convert a distribution to WSL 2 with:
wsl --set-version <DistributionName> 2
Conclusion
Setting up WSL on Windows 11 is straightforward and opens up a world of Linux tools and workflows without leaving your Windows environment. Whether you’re a developer, data scientist, or Linux enthusiast, WSL provides a seamless way to run Linux distributions like Ubuntu, Debian, or Kali Linux. With WSL 2 and WSLg, you can even run GUI applications and enjoy near-native performance.
Experiment with different distributions and configurations to tailor your WSL setup to your needs. Happy coding!