Everything in this blog starts from scratch, as I’m not a Pro Python developer and have never had the chance to work on proper Python projects or explore its ecosystem. Since Python has a superior ecosystem when it comes to Machine Learning (ML) and Large Language Models (LLMs), I’ve decided to dive in and learn. In this blog, I’ll be exploring Python and its ecosystem to tackle my first problem. Let’s get started…
We are going to use the following stack to solve all the projects.
- Python: A high-level, interpreted programming language used for web development, data analysis, machine learning, and automation. Python is known for its simplicity, flexibility, and extensive libraries, making it a popular choice among developers and data scientists.
- Streamlit: An open-source Python library for building and deploying data-driven web applications. It allows users to create interactive dashboards, visualizations, and machine learning models with minimal code.
- Llama (e.g., Llama3, Phi3): Llama is a family of large language models (LLMs) developed by Meta AI. Llama3 and Phi3 are specific models within this family, designed for natural language processing tasks such as text generation, question-answering, and conversational dialogue.
- Hugging Face: Hugging Face Spaces is a platform that allows you to deploy and run your machine learning models as web applications. You can create a Space and deploy your model, and Hugging Face will take care of the infrastructure and scaling.
Installation
- Install Python
- Go to the official Python download page: https://www.python.org/downloads/
- Click on the “Download Now” button for the latest version of Python (currently Python 3.10).
- Choose the installation package that matches your operating system (Windows, macOS, or Linux).
- Follow the installation instructions to install Python on your computer.
- Once the installation is complete, open a terminal or command prompt and type
python --versionto verify that Python is installed correctly.
- Install Streamlit
- Open a terminal or command prompt and type
pip install streamlitto install Streamlit using pip.- Once the installation is complete, type
streamlit --versionto verify that Streamlit is installed correctly.
- Download the Ollama Installer
- Go to the OLLama website: https://ollama.com/download
- Click on the “Download” button to download the OLLama installer.
- Choose the correct installer for your operating system (Windows, macOS, or Linux).
- Install and run the model using ollama run [model_name]
- Install VSCode
- Go to the official VSCode website: https://code.visualstudio.com/
- Click on the “Download” button to download the VSCode installer for your operating system (Windows, macOS, or Linux).
- Choose the correct installer for your operating system and architecture (32-bit or 64-bit).
- Download and install VScode
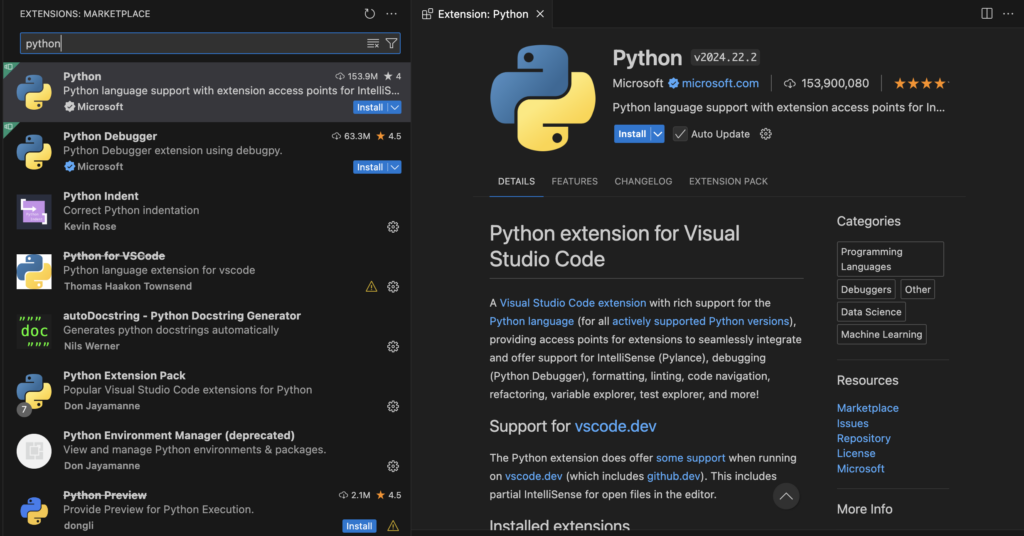
- Click on the Extensions icon in the left sidebar or press
Ctrl + Shift + X(Windows/Linux) orCmd + Shift + X(macOS) to open the Extensions panel. 
- Search for “Python” in the Extensions marketplace.
- Select the “Python” extension by Microsoft from the search results.
- Click the “Install” button to install the Python extension.
- Wait for the installation to complete.
Setup up Dev environment
- Open VSCode, create parent folder llmprojects and navigate to terminal
- Creating a virtual environment is a best practice before starting any Python project, as it provides a isolated environment for your project, allowing you to manage dependencies independently, control Python and package versions, and collaborate with others more effectively. here are the commands to setup virutal env.
- Now after creating a virtual environment, you need to activate it. Remember to activate the relevant virtual environment every time you work on the project. This can be done using the following command
pip install virtualenv
virtualenv chatbot
Linux/MacOS
source chatbot/bin/activate
Windows
.\chatbot\Scripts\activateStart coding…
- Open VSCode and navigate to <<PATH>>/llmprojects/chatbot folder.
- Let’s create the necessary files for our project. We’ll start by creating a main file(app.py), which will contain the code to run the app, and a dependency file(requirements.txt)that lists all the dependencies required for this project.
- Create requirements.txt and add the following dependencies and save it.
streamlit==1.17.0llama-index==0.6.0ollama- Run the pip install -r requirements.txt command to install the dependencies
- Add the following code in app.py file.
import streamlit as st
import ollama
st.title("💬 Simple Chatbot")
if "messages" not in st.session_state:
st.session_state["messages"] = [{"role": "assistant", "content": "How can I help you?"}]
### Write Message History
for msg in st.session_state.messages:
if msg["role"] == "user":
st.chat_message(msg["role"], avatar="🧑💻").write(msg["content"])
else:
st.chat_message(msg["role"], avatar="🤖").write(msg["content"])
## Generator for Streaming Tokens
def generate_response():
response = ollama.chat(model='llama3.2', stream=True, messages=st.session_state.messages)
#? "phi:latest" replace with your model
for partial_resp in response:
token = partial_resp["message"]["content"]
st.session_state["full_message"] += token
yield token
if prompt := st.chat_input():
st.session_state.messages.append({"role": "user", "content": prompt})
st.chat_message("user", avatar="🧑💻").write(prompt)
st.session_state["full_message"] = ""
st.chat_message("assistant", avatar="🤖").write_stream(generate_response)
st.session_state.messages.append({"role": "assistant", "content": st.session_state["full_message"]})
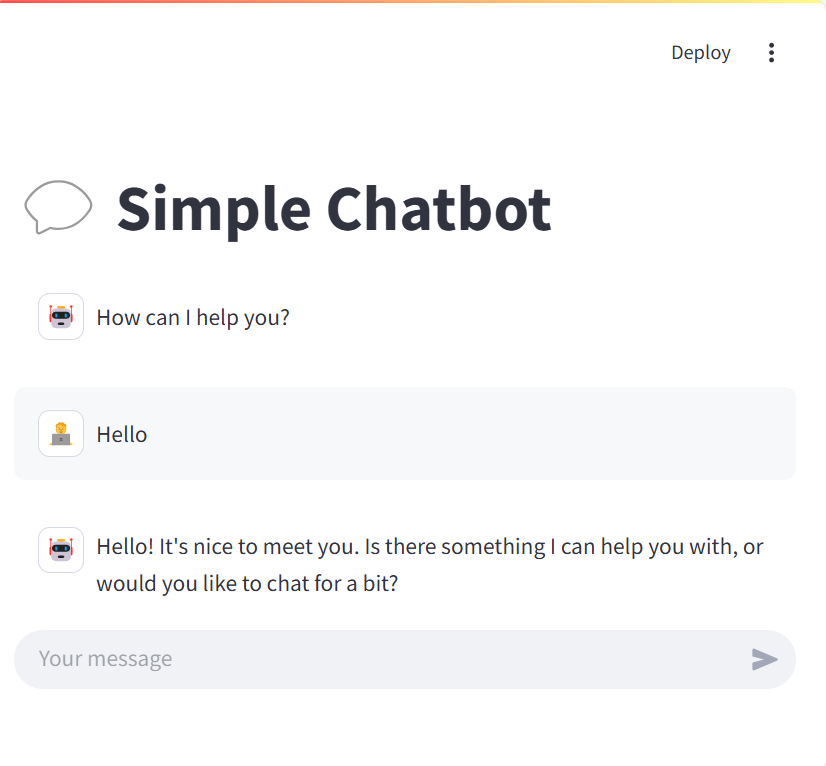
- Run the app using the following command
streamlit run app.py- Output

- Full Code
Code walkthrough
- Initialize Session State:
if "messages" not in st.session_state: st.session_state["messages"] = [{"role": "assistant","content": "How can I help you?"}]This checks if there is a messages key in the st.session_state. If not, it initializes it with a list containing one message from the assistant saying “How can I help you?”.
- Display Message History:
for msg in st.session_state.messages:if msg["role"] == "user":st.chat_message(msg["role"],avatar="🧑💻").write(msg["content"]) else:st.chat_message(msg["role"],avatar="🤖").write(msg["content"])This loop iterates over each message in the messages list stored in st.session_state. It checks the role of each message (user or assistant) and displays it with the appropriate avatar (💻 for the user and 🤖 for the assistant).
- Generator for Streaming Tokens:
def generate_response():response = ollama.chat(model='llama3.2', stream=True, messages=st.session_state.messages)for partial_resp in response: token = partial_resp["message"]["content"] st.session_state["full_message"] += tokenyield tokenThis function generates the response from the chatbot. It uses the ollama.chat method to get a response from the model (llama3.2). The stream=True parameter indicates that the response should be streamed token by token. The function yields each token one by one, allowing for real-time updates in the chat interface.
- Handle User Input:
if prompt := st.chat_input(): st.session_state.messages.append({"role": "user","content": prompt}) st.chat_message("user", avatar="🧑💻").write(prompt)st.session_state["full_message"] = ""st.chat_message("assistant", avatar="🤖").write_stream(generate_response)st.session_state.messages.append({"role": "assistant", "content": st.session_state["full_message"]})- This block handles user input. If the user types a message and submits it, the following steps occur:
- The user’s message is appended to the
messageslist inst.session_state. - The user’s message is displayed in the chat interface with the 💻 avatar.
- The
full_messagevariable inst.session_stateis reset to an empty string. - The assistant’s response is streamed to the chat interface using the
generate_responsefunction. - After the response is fully generated, it is appended to the
messageslist inst.session_state
- The user’s message is appended to the
Error Handling and Troubleshooting
While running the above program, you might encounter the following errors. Here are some common issues and their solutions:
- ModuleNotFoundError: No module named ‘altair.vegalite.v4‘
Uninstall all the dependencies using the following command.
pip uninstall -r requirements.txtPlease remove the streamlit dependency and run the following commands again. This will resolve the above issue.
pip install streamlit
pip install -r requirements.txt